
การพัฒนาเทคโนโลยีทางด้านข้อมูลเป็นที่กล่าวถึงอย่างมากในปัจจุบัน เนื่องจากข้อมูลเหล่านั้นสามารถนำไปสำรวจ วิเคราะห์ และคาดการณ์สิ่งต่าง ๆ ในอนาคตได้ทั้งนี้การนำข้อมูลไปใช้การวิเคราะห์ให้มีประสิทธิภาพ และมีความถูกต้องแม่นยำ จำเป็นต้องใช้ข้อมูลเป็นจำนวนมากสำหรับการประมวลผล ส่งผลให้การจัดเก็บรวบรวมข้อมูลเข้ามามีบทบาทมากขึ้น
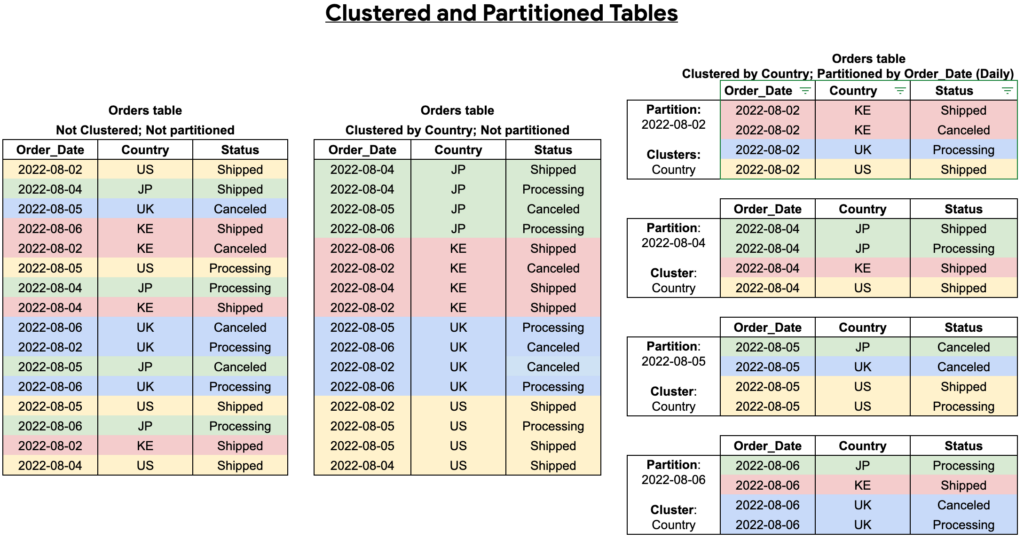
แพลตฟอร์ม BigQuery เป็นสถาปัตยกรรมแบบคลังข้อมูล สามารถบริหารจัดการ และรองรับการวิเคราะห์ข้อมูลจำนวนมาก อย่างไรก็ตาม แม้ว่า BigQuery จะเป็นเทคโนโลยีที่สนับสนุนการจัดการข้อมูลขนาดใหญ่ แต่หากข้อมูลมีขนาดใหญ่จนเกินไป ก็ยังคงส่งผลทำให้ประสิทธิภาพในการวิเคราะห์ข้อมูลลดลง และมีต้นทุนที่เพิ่มมากขึ้น เพื่อลดปัญหาดังกล่าว เราสามารถแบ่งตารางที่มีขนาดใหญ่ให้เป็นส่วนต่าง ๆ ตามการ Partition เรียกว่าการทำ Partition หรือการจัดกลุ่มของข้อมูลตามค่าใน Field ที่เรียกว่าการทำ Cluster โดยบทความนี้จะเสนอวิธีการทำ Partition และ Cluster ของตารางบน BigQuery ด้วยกัน 3 วิธี คือ
- การสร้างตารางผ่าน Cloud Console
- การสร้างและปรับตารางใน BigQuery ด้วย SQL
- การสร้างตารางผ่านทาง Python
สำหรับการสร้างตารางแต่ละครั้ง เราสามารถสร้างตารางเป็นทั้งแบบ Partition และ Cluster หรือเลือกทำอย่างใดอย่างหนึ่ง สำหรับการเลือก Field ที่ใช้ในการทำ Partition ควรเลือกให้เหมาะสม และสอดคล้องกับข้อมูลที่ใช้ โดยทั่วไป Field ที่ถูกเลือกมาทำ Partition จะอยู่ในรูปแบบของวันที่ เวลา หรือจำนวนเต็ม โดยสำหรับบทความนี้จะเป็นการแนะนำวิธีการทำ Partition ด้วย Field ที่อยู่ในรูปแบบของวัน หรือเวลาเท่านั้น
1. การสร้างตารางแบบ Partition และ Cluster ผ่าน Cloud Console
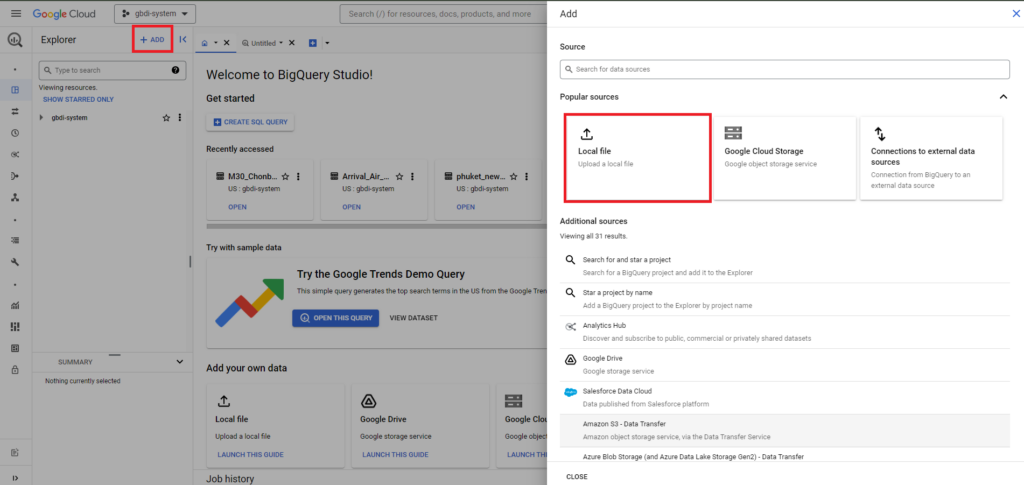
สำหรับการสร้างตารางผ่าน Cloud Console ของ BigQuery โดยเริ่มจากการสร้างตารางด้วยการกดปุ่ม ADD ทางเมนูด้านบนหน้าจอ จะปรากฏหน้าต่าง Add สำหรับกำหนดโครงสร้างของตาราง โดยในส่วนของ Popular sources เลือกเป็น Local file
จากนั้นจะปรากฏหน้าต่าง Create table ทำการกำหนดค่าในส่วนต่าง ๆ ดังนี้
- Source: เป็นส่วนที่กำหนดรูปแบบการสร้างตาราง เลือกเป็น Empty table
- Destination: เป็นส่วนที่ใช้ในการกำหนดชื่อ Project และ Dataset พร้อมกับการตั้งชื่อของตาราง
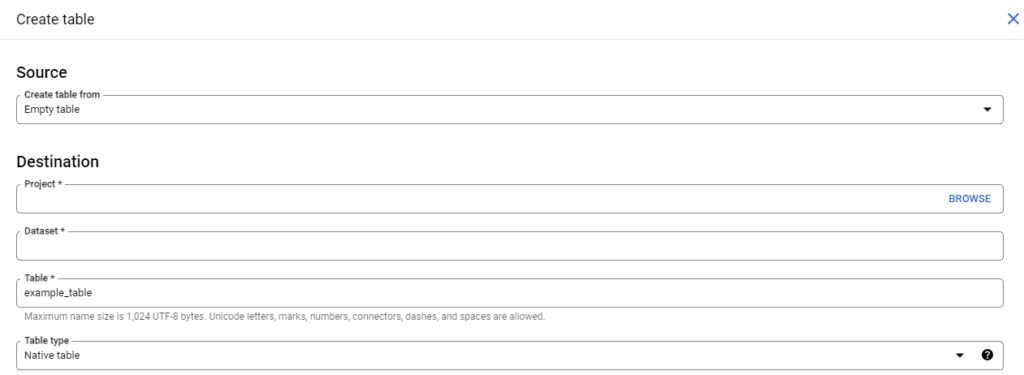
- Schema: เป็นส่วนในการกำหนด Schema ทั้งหมดของข้อมูล ซึ่งสามารถกำหนดได้ 2 วิธี
- การเพิ่ม Field ของข้อมูลทีละ Field โดยกดที่คำสั่ง “ADD FIELD” และทำการกำหนด Field name และ Type ของแต่ละ Field

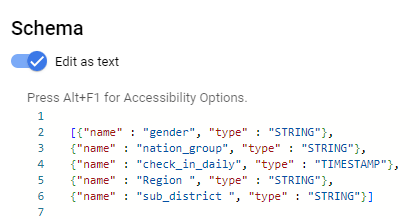
- การเพิ่ม Field ทั้งหมดโดยการใส่เป็นคำสั่ง โดยกดปุ่ม “Edit as text” (สถานะจะเปลี่ยนจากสีเทาเป็นสีฟ้า) แล้วใส่คำสั่ง ซึ่งจะต้องกำหนดชื่อคอลัมน์ และประเภทของคอลัมน์ ตามโครงสร้างดังรูป
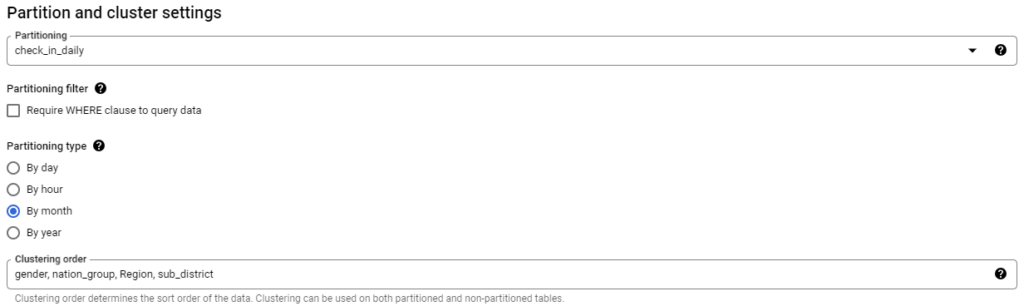
- Partition and cluster settings: เป็นส่วนที่กำหนดรูปแบบของการทำ Partition และ Cluster เมื่อกำหนด Schema ของข้อมูลตามขั้นตอนก่อนหน้านี้แล้ว ในส่วนของ Partitioning จะสามารถเลือก Field ที่ใช้เพื่อทำการ Partition ได้ โดยในส่วนของ Partitioning type เราสามารถเลือกรูปแบบของการทำ Partition ได้ 4 รูปแบบ คือ รายชั่วโมง (By hour), รายวัน (By day), รายเดือน (By month) และรายปี (By year)
หลังจากการกำหนดในส่วนของ Partition เรียบร้อยแล้ว หากต้องการให้ตารางมีการทำ Cluster สามารถกำหนด Field ที่จะใช้ในการทำ Cluster ตรงส่วนของ Clustering order ซึ่งสามารถกำหนด Field ได้สูงสุด 4 Fields และเมื่อกำหนดรายละเอียดทุกอย่างเรียบร้อยแล้วทำการกดคำสั่ง Create table เพื่อสร้างตาราง
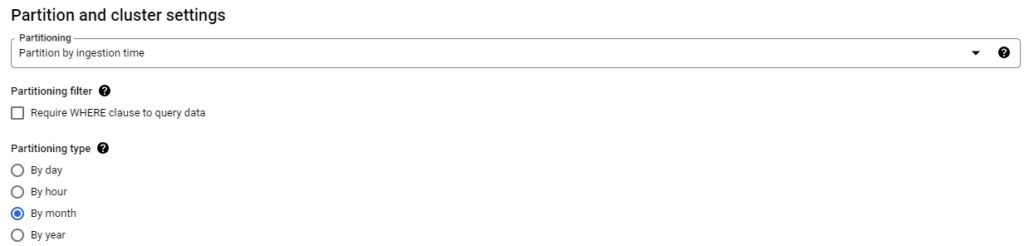
ในกรณีที่ไม่มีการกำหนด Schema ของตารางไว้ก่อน ก็ยังสามารถทำ Partition ให้กับตารางใน BigQuery ได้ โดยข้อมูลจะถูกแบ่ง Partition ตามวัน หรือเวลาของข้อมูลที่ถูกเพิ่มเข้าตาราง โดยในส่วนของ Partitioning เลือกเป็น “Partition by ingestion time” และเลือกรูปแบบการทำ Partition ของข้อมูล
2. การสร้างและปรับตารางใน BigQuery ให้เป็น Partition หรือ Cluster ด้วย SQL
เริ่มต้นการทำงานผ่าน Cloud Console ของ BigQuery เช่นเดียวกับวีธีแรก และกดปุ่ม + ที่เมนูด้านบนเพื่อเปิดหน้าต่าง SQL Query

จากนั้นกำหนด SQL code สำหรับการสร้างตาราง โดยต้องกำหนด Schema และ Field ที่จะใช้ในการทำ Partition และ Cluster ของตาราง พร้อมทั้งกำหนดรูปแบบในการทำ Partition ของข้อมูล ตามตัวอย่างต่อไปนี้
CREATE TABLE your_project.your_dataset.your_table_name
(	gender STRING,
nation_group STRING,
check_in_daily TIMESTAMP,
Region STRING,
sub_district STRING )
PARTITION BY DATE_TRUNC(check_in_daily, MONTH)
CLUSTER BY gender, nation_group, Region, sub_district
หากต้องการปรับตารางที่ถูกสร้างไว้แล้วใน BigQuery จาก non-Partition ให้เป็นแบบ Partition และ Cluster สามารถแก้ไขตารางโดยใช้ SQL code โดยระบุตารางที่ต้องการจัดการ และกำหนดรายละเอียดของตารางใหม่ กำหนด Field ที่จะใช้ในการทำ Partition และ Cluster ของตาราง พร้อมกับการกำหนดรูปแบบในการทำ Partition ตามตัวอย่างต่อไปนี้
CREATE TABLE your_project.your_dataset.New_table_name //ตั้งชื่อตารางใหม่
PARTITION BY DATE_TRUNC(check_in_daily, MONTH)
CLUSTER BY gender, nation_group, Region, sub_district
AS
SELECT * FROM your_project.your_dataset.Old_table_name; // เลือกตารางที่ต้องการ Copy
ตัวอย่างการกำหนดรูปแบบในการทำ Partition แบบอื่น ๆ
- Default ของการทำ Partition เป็นรูปแบบของรายวัน
PARTITION BY ชื่อ Column- การกำหนด Partition เป็นรายปี
PARTITION BY DATE_TRUNC(field, YEAR)หากต้องการกำหนด Partition ในรูปแบบอื่น ๆ สามารถศึกษารายละเอียดเพิ่มเติมได้ที่ Data definition language (DDL) statements in GoogleSQL
หลังจากนั้นทำการลบตารางเดิมที่เป็นแบบ non-Partition โดยใช้คำสั่งดังนี้
DROP TABLE Old_table_name;3. การสร้างตารางแบบ Partition และ Cluster ผ่าน Python code
ทำการกำหนด Schema ทั้งหมดของข้อมูล ซึ่งสามารถกำหนดได้ 2 รูปแบบ คือ
- การกำหนด Schema ของข้อมูล ผ่านคำสั่งจาก Library ของ BigQuery
from google.cloud import bigquery
schema = [ bigquery.SchemaField("gender", "STRING"),
    bigquery.SchemaField("nation_group ", "STRING"),
bigquery.SchemaField("check_in_daily", "TIMESTAMP"), ]- การกำหนด Schema ของข้อมูลในรูปแบบของไฟล์ json
เริ่มต้นการทำงานด้วยการกำหนด Schema ของข้อมูล และจัดเก็บในรูปแบบของไฟล์ json ก่อน แล้วจึงทำการโหลดไฟล์ Schema นั้นมาใช้ มีข้อแนะนำให้กำหนด Field ของข้อมูลทั้งหมดให้อยู่ในรูปแบบตาราง และจัดเก็บเป็นไฟล์ csv หรือ excel ก่อน โดยต้องกำหนดรายละเอียด 2 ส่วน คือ (a) ชื่อ Field ของข้อมูล จัดเก็บไว้ในคอลัมน์ กำหนดชื่อคอลัมน์ว่า ‘name‘ และ (b) ประเภทของ Field จัดเก็บไว้ในคอลัมน์ กำหนดชื่อคอลัมน์ว่า ‘type‘
| name | type |
| gender | STRING |
| nation_group | STRING |
| check_in_daily | TIMESTAMP |
จากนั้นทำการปรับ Schema จากรูปแบบตารางให้อยู่ในรูปแบบของไฟล์ json ด้วย Python โดยใช้คำสั่งทำการอ่านไฟล์ Schema ที่อยู่ในรูปแบบของ csv หรือ excel และจะใช้คำสั่ง to_json() ในการปรับ Schema ให้เป็นไฟล์ json
schema_table = pd.read_csv(‘filename.csv’)
schema_table.to_json(‘filename.json’,orient="records")
หลังจากจัดการ Schema ของข้อมูลให้อยู่ในไฟล์ json เรียบร้อยแล้ว ทำการเรียกใช้ Schema จากไฟล์ เพื่อสร้างตารางบน BigQuery โดยใช้คำสั่ง schema_from_json()
from google.cloud import bigquery
client = bigquery.Client()
schema = client.schema_from_json("./filename.json")
เมื่อทำการจัดการ Schema ของข้อมูลเรียบร้อยแล้ว สามารถกำหนดคำสั่งในส่วนของการสร้างตารางทั้งแบบ Partition และ Cluster ได้ตามตัวอย่าง
from google.cloud import bigquery
client = bigquery.Client()
# รูปแบบของการกำหนด "your-project.your_dataset.your_table_name"
table_id = your_fully_qualified_table_id
table = bigquery.Table(table_id, schema=schema)
table.clustering_fields = ["gender","nation_group","Region","sub_district"] # ใส่ field สำหรับการทำ cluster
table.time_partitioning = bigquery.TimePartitioning(
type_=bigquery.TimePartitioningType.MONTH,
field="check_in_daily", # ชื่อของ field ที่ต้องการทำ parition
expiration_ms=1000 * 60 * 60 * 24 * 90, ) # 90 days
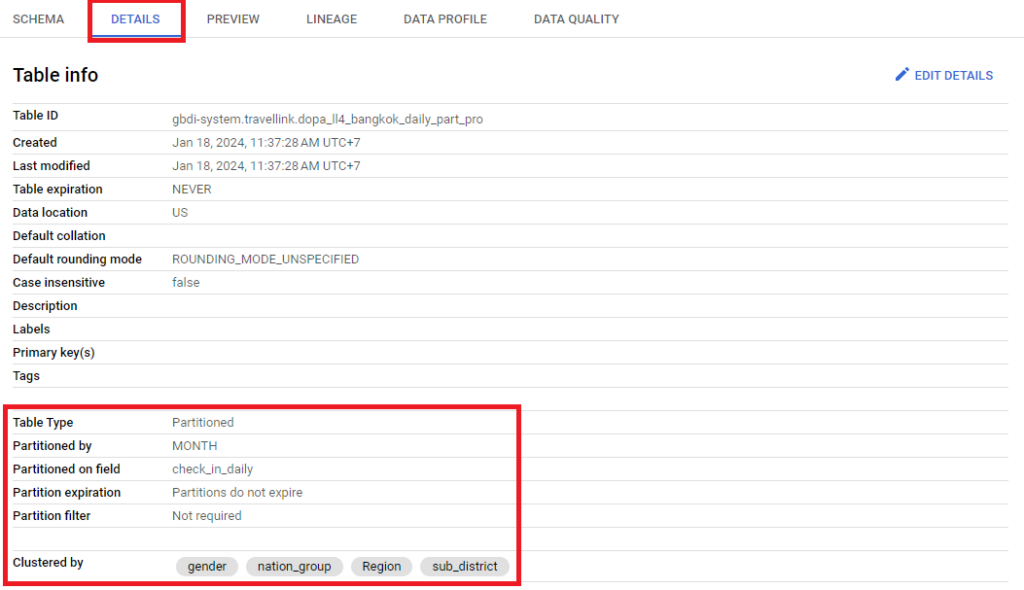
table = client.create_table(table)หากต้องการตรวจสอบรายละเอียดของตาราง ให้ทำการเลือกตารางที่ต้องการตรวจสอบ จากนั้นเลือกเมนู DETAILS ซึ่งจะแสดงรายละเอียดทั้งรูปแบบการทำ Partition, Field ที่ใช้ในการทำ Partition รวมทั้ง Field ที่ใช้ในการทำ Cluster หากมีการกำหนดเพิ่มเติม
ในบทความนี้นำเสนอวิธีการในการสร้างตารางบน BigQuery ที่เป็นแบบ Partition และ Cluster โดยสามารถสร้างตารางผ่าน Cloud Console ของ BigQuery ได้โดยตรง หรือใช้คำสั่ง SQL ผ่าน SQL Query บน BigQuery หรือใช้คำสั่ง python ในการสร้างตารางได้ด้วยเช่นเดียวกัน หวังว่าบทความนี้จะเป็นประโยชน์ต่อการจัดการข้อมูลขนาดใหญ่ใน BigQuery ซึ่งจะช่วยเพิ่มประสิทธิภาพในการจัดการข้อมูล และลดต้นทุนในการใช้งานได้
บทความโดย ณิชากร นำเจริญพินิจ
ตรวจทานและปรับปรุงโดย ดวงใจ จิตคงชื่น

Data Scientist at Big Data Institute (Public Organization), BDI
Vice President, Manpower Development Division at Big Data Institute (Public Organization), BDI