จากที่เราได้กล่าวถึง Data Catalog ว่าคืออะไร และมีประโยชน์อย่างไรในบทความ “ดาต้าแคตตาล็อก (Data Catalog) จะช่วยเตรียมความพร้อมรับมือ COVID-19 ได้อย่างไร” ในบทความนี้ เราจะมาลองติดตั้ง Data Catalog เพื่อทดลองใช้งานกัน
CKAN เป็น Open Source Data Portal Software ที่สามารถใช้ทำ Data Catalog ของหน่วยงานได้ โดยหน่วยงานต่าง ๆ สามารถนำมาใช้งานได้ฟรีไม่เสียค่าใช้จ่าย การเป็น Open Source หมายความว่า มีการเปิดให้เห็น source code ของตัวซอฟต์แวร์ ซึ่งเราสามารถนำมาศึกษาได้
CKAN ถูกใช้โดยรัฐบาลและหน่วยงานมากมายทั่วโลก อาทิ สหรัฐอเมริกา แคนาดา สวิสเซอร์แลนด์ และออสเตรเลีย เป็นต้น และยังมีตัวอย่างอื่น ๆ อีกมากมาย สำหรับผู้ที่สนใจสามารถเข้าไปเยี่ยมได้ที่ https://ckan.org/about/instances อีกทั้ง Data Portal Software ที่สำนักงานพัฒนาวิทยาศาสตร์และเทคโนโลยีแห่งชาติ (สวทช.) กำลังพัฒนา ก็มีการต่อยอดมาจาก CKAN เช่นกัน
จึงเป็นการดีที่หน่วยงานที่กำลังคิดจะทำ Data Catalog จะมาลองติดตั้งและเล่นกับ CKAN ดู เพื่อเป็นหนึ่งในตัวเลือกของ software ที่จะมาใช้ทำ Data Catalog
Requirements
สำหรับการทดลองติดตั้ง CKAN ขอให้จัดเตรียม Virtual Machine ที่มีคุณสมบัติ ดังนี้
- OS: Ubuntu 18
- CPU: 2 core
- RAM: 4 GB
- Disk: 10 GB
**หมายเหตุ คุณสมบัตินี้ ใช้สำหรับการทำ prototype เท่านั้น
Installation
สำหรับ prototype นี้ เราจะทำการติดตั้ง CKAN 2.9 from source (Python 3)
ขั้นตอนที่ 1 Install the required packages
การติดตั้ง CKAN เริ่มต้นที่การติดตั้ง package ที่เกี่ยวข้อง
1. เริ่มต้นที่การ update รายการ package ที่ VM รู้จักด้วยคำสั่ง
sudo apt update2. จากนั้นทำการติดตั้ง package ที่จำเป็นสำหรับ CKAN 2.9 โดยรายการ package ที่จำเป็นมีดังนี้
- Python3-dev ใช้สำหรับรันโปรแกรม CKAN เนื่องจาก CKAN 2.9 เขียนด้วยภาษา python 3
- Postgresql เป็นระบบฐานข้อมูลที่ CKAN เลือกใช้
- Libpq-dev
- Python3-pip ใช้สำหรับติดตั้ง library ภายใน python 3
- Python3-venv ใช้สำหรับสร้าง virtual environment ของ python 3
- Git-core ใช้สำหรับโหลด source code ของ CKAN และ extension อื่น ๆ
- Openjdk-8-jdk
- Redis-server
sudo apt-get install python3-dev postgresql libpq-dev python3-pip python3-venv git-core openjdk-11-jdk redis-server solr-tomcatขั้นตอนที่ 2 Install CKAN into a Python virtual environment
ทำการติดตั้ง CKAN ไว้ใน python virtual environment
1. สร้าง directory และทำการอ้างอิง (symlink) ไปยังโฟลเดอร์ด้วยคำสั่ง
mkdir -p ~/ckan/lib
sudo ln -s ~/ckan/lib /usr/lib/ckan
mkdir -p ~/ckan/etc
sudo ln -s ~/ckan/etc /etc/ckan
2. สร้าง python virtual environment สำหรับ CKAN เพื่อให้สามารถควบคุมเวอร์ชั่นของ library ที่เจาะจงสำหรับ CKAN
sudo mkdir -p /usr/lib/ckan/default
sudo chown `whoami` /usr/lib/ckan/default
python3 -m venv /usr/lib/ckan/default
3. ทำการเข้าสู่ virtual environment ที่สร้างสำหรับ CKAN
. /usr/lib/ckan/default/bin/activateสังเกตว่า เราได้เข้าสู่ virtual environment ได้จากการมี (default) เพิ่มขึ้นมาข้างหน้า

4. ติดตั้ง setuptools เวอร์ชั่น 44.1.0
pip install setuptools==44.1.05. อัพเดท pip (package สำหรับจัดการ library python)
pip install --upgrade pip6. ติดตั้ง CKAN 2.9.1 ใน virtual environment ที่สร้างโดยใช้ source code จาก github
pip install -e 'git+https://github.com/ckan/ckan.git@ckan-2.9.1#egg=ckan[requirements]'7. หลังจากติดตั้ง CKAN-2.9.1 เรียบร้อยแล้ว ทำการ restart virtual environment
deactivate
. /usr/lib/ckan/default/bin/activate
ขั้นตอนที่ 3 Setup postgres database for CKAN
1. ขั้นตอนถัดมาเป็นการ setup database สำหรับ CKAN ทำการ list ดู postgres database และตรวจสอบว่า Encoding เป็น UTF8 และ เป็น en_US.UTF-8 (หากไม่ใช่ สามารถทำตาม website https://makandracards.com/makandra/18643-how-to-change-the-locale-of-a-postgresql-cluster นี้ เพื่อทำการเปลี่ยน cluster’s locale)
sudo -u postgres psql -l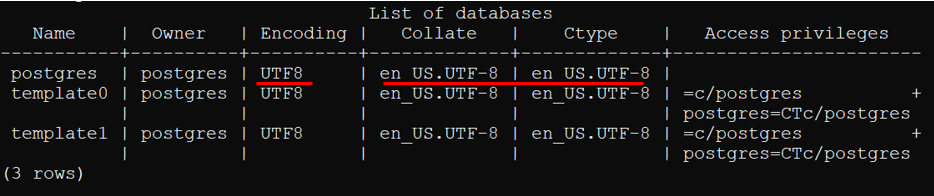
2. สร้าง database user สำหรับ CKAN โดยตั้งชื่อว่า ckan_default
sudo -u postgres createuser -S -D -R -P ckan_default3. สร้าง database ชื่อ ckan_default โดยมี owner เป็น ckan_default user ที่เพิ่งสร้างเมื่อครู่
sudo -u postgres createdb -O ckan_default ckan_default -E utf-84. List ดู databases อีกที และตรวจสอบ database ที่เพิ่งสร้าง
sudo -u postgres psql -l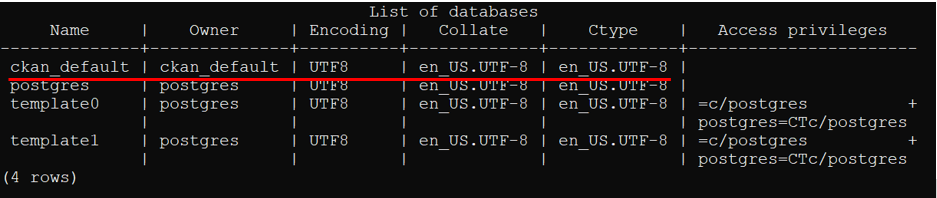
ขั้นตอนที่ 4 Create and Edit a CKAN config file
สร้างและตั้งค่า config file ของ CKAN
1. สร้าง directory สำหรับ CKAN config file พร้อมทั้งตั้งค่าให้เราเป็นเจ้าของ directory นั้น
sudo mkdir -p /etc/ckan/default
sudo chown -R `whoami` /etc/ckan/
2. สร้าง CKAN config file
ckan generate config /etc/ckan/default/ckan.ini3. ตั้งค่าตัวแปร ภายใน CKAN config file
เปิด config file โดยใช้โปรแกรม vim
sudo vim /etc/ckan/default/ckan.iniแก้ไขบรรทัดต่อไปนี้
| sqlalchemy.url | sqlalchemy.url = postgresql://ckan_default:pass@bigdata.go.th/ckan_default **ให้แทน pass ด้วย password ที่เพิ่งตั้งให้ database user เมื่อสักครู่ |
| ckan.site_url | http://ipaddress **แทน ipaddress ด้วย ip ของ virtual machine |
ขั้นตอนที่ 5 Setup Solr
ทำการ config solr ซึ่งเป็น software ที่ช่วยในเรื่องการค้นหาชุดข้อมูลของ CKAN
1. เปลี่ยน config file ของ tomcat ให้เชื่อมต่อกับ port 8983
เปิด config file โดยใช้โปรแกรม vim
sudo vim /etc/tomcat9/server.xmlแก้ไขบรรทัดต่อไปนี้ (ประมาณบรรทัดที่ 69)
| จาก <Connector port=”8080” protocol=”HTTP/1.1″ เป็น <Connector port=”8983” protocol=”HTTP/1.1″ |
2. ใช้ schema.xml จาก CKAN source แทนตัวที่ solr ใช้อยู่
ทำการ backup schema.xml ที่มี
sudo mv /etc/solr/conf/schema.xml /etc/solr/conf/schema.xml.bakจากนั้น Symlink schema.xml มาจาก CKAN source
sudo ln -s /usr/lib/ckan/default/src/ckan/ckan/config/solr/schema.xml /etc/solr/conf/schema.xml3. Restart solr service
sudo service tomcat9 restart4. ตรวจสอบว่า solr ทำงาน ผ่าน web browser โดยการพิมพ์ URL
http://<ip address>:8983/solr
ปรากฎหน้าจอดังตัวอย่าง

5. **สำหรับ ubuntu 18.04 หรือเก่ากว่า อาจจะเจอ error message
java.io.IOException: Cannot create directory: /var/lib/solr/data/index
ให้ทำการแก้ไข โดยใช้คำสั่งต่อไปนี้ แล้วลองเปิดหน้า solr ผ่าน web browser ดูใหม่อีกครั้ง
sudo mv /etc/systemd/system/tomcat9.d /etc/systemd/system/tomcat9.service.d
sudo systemctl daemon-reload
sudo service tomcat9 restart
6. แก้ไข solr_url setting ใน CKAN config file
เปิด config file โดยใช้โปรแกรม vim
sudo vim /etc/ckan/default/ckan.iniแก้ไขบรรทัดต่อไปนี้
| solr_url | **uncomment บรรทัดนี้ solr_url=http://127.0.0.1:8983/solr |
ขั้นตอนที่ 6 Link to who.ini
1. สร้าง symlink
ln -s /usr/lib/ckan/default/src/ckan/who.ini /etc/ckan/default/who.iniขั้นตอนที่ 7 Create CKAN database tables
สร้าง ckan database tables
ckan -c /etc/ckan/default/ckan.ini db initขั้นตอนที่ 8 Install and Config nginx
CKAN2.9 จำเป็นต้องลง nginx web server เพื่อให้สามารถเปิด CKAN website จากภายนอกได้ (nginx จะทำหน้าที่รับ requests จากภายนอกแล้ว forwards เข้า localhost ซึ่ง CKAN2.9 ถูกติดตั้งเอาไว้)
1. ติดตั้ง nginx
sudo apt install nginx2. ตั้งค่า nginx สำหรับ CKAN ที่ sites-available
เข้าไปยัง directory sites-available และเขียนการตั้งค่าโดยใช้โปรแกรม vim
cd /etc/nginx/sites-available
sudo vim ckan
กรอกการตั้งค่าดังตารางข้างล่าง
| server{ location / { proxy_pass http://127.0.0.1:5000/; proxy_http_version 1.1; proxy_set_header Upgrade $http_upgrade; proxy_set_header Connection ‘upgrade’; proxy_set_header Host $host; proxy_cache_bypass $http_upgrade; } } |
3. ทำการ enable CKAN site โดยจะทำการ symlink การตั้งค่าไปยัง sites-enabled
เข้าไปยัง directory sites-enabled และตรวจสอบดูไฟล์ภายใน
cd ../sites-enabled
ls
จะพบว่ามี default อยู่ ให้ลบออก

sudo rm defaultจากนั้น symlink การตั้งค่าสำหรับ ckan เมื่อสักครู่มายัง sites-enabled
sudo ln -s /etc/nginx/sites-available/ckan /etc/nginx/sites-enabled/ckanหากตรวจสอบดูอีกที จะพบว่ามี ckan ใน directory นี้แล้ว
ls
4. หลังจากตั้งค่าเสร็จแล้ว ทำการ restart nginx
sudo systemctl restart nginx5. หลังจากนั้นตรวจสอบสถานะ nginx ว่า active (running) อยู่
sudo systemctl status nginx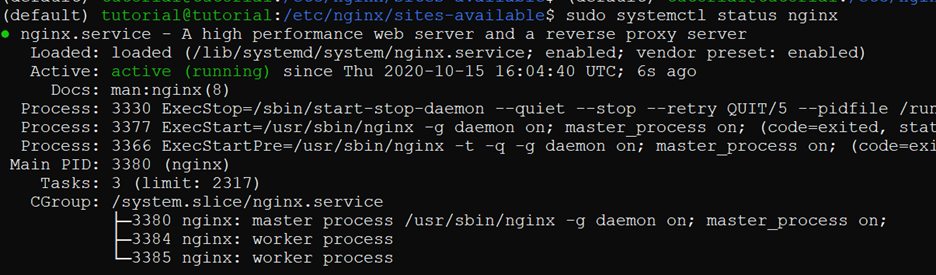
ขั้นตอนที่ 9 Create system admin account
ก่อนที่จะใช้งาน CKAN ได้นั้น จำเป็นต้องสร้าง system admin account
1. หากยังไม่ได้อยู่ใน virtual environment ให้เข้าไปเสียก่อน
. /usr/lib/ckan/default/bin/activate
cd /usr/lib/ckan/default/src/ckan
2. จากนั้นสร้าง system admin account โดยใช้คำสั่งต่อไปนี้
(ให้ตั้งชื่อ admin และ email ตามที่ต้องการ)
ckan -c /etc/ckan/default/ckan.ini sysadmin add admin email=admin@bigdata.go.th name=adminระบบจะทำการถามว่า ต้องการสร้าง account ใหม่ใช่หรือไม่ (Y) และให้กรอก password
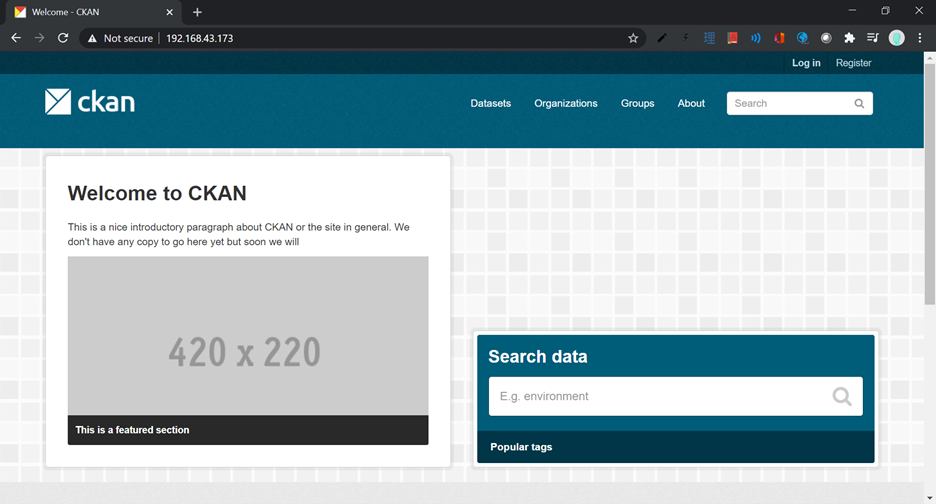
ขั้นตอนที่ 10 Test accessing CKAN website
ทดสอบการเข้าถึง CKAN website
1. run CKAN server
ckan -c /etc/ckan/default/ckan.ini run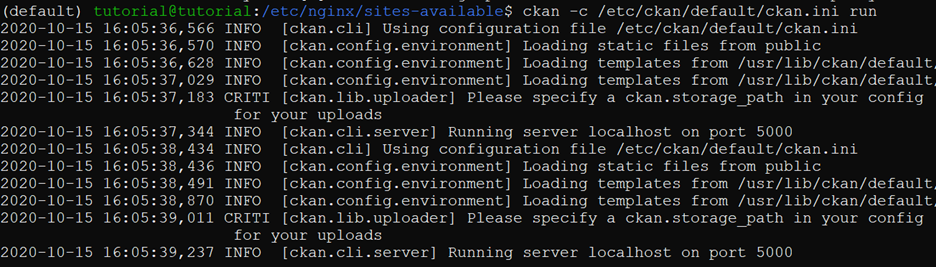
2. เปิดที่ web browser และเข้าไปยัง IP address ของเครื่อง Virtual Machine ที่ลง CKAN
http://<ipaddress>
CKAN Extensions
ในการติดตั้งที่เราได้ทำไปนั้น เป็นการติดตั้งในส่วนพื้นฐานของ CKAN แต่ CKAN ยังมีส่วนเพิ่มเติม (Extensions) ที่เราสามารถไปทดลองติดตั้งเพิ่มเติมได้ เพื่อเพิ่มฟังก์ชั่นการทำงานให้กับ Data Catalog ของเรา อาทิ
| FileStore | ที่ทำให้เราสามารถอัพโหลดไฟล์ขึ้นไปยัง Data Catalog |
| DataStore | ที่หลังจากข้อมูลถูกส่งเข้าไปเก็บที่ Datastore จะทำให้เราสามารถเรียกใช้งาน DataStore API ในการค้นหา กรอง เปลี่ยนแปลงข้อมูลได้ และยังสามารถใช้งาน Data Explorer ในการ preview ข้อมูลในหน้า resource อย่างอัตโนมัติได้อีกด้วย |
| DataPusher | ที่ช่วยดึงข้อมูลที่เราใส่เข้าไปใน Data Catalog (ไม่ว่าจะด้วยการวาง link หรือการอัพโหลดไฟล์) และส่งเข้าไปยัง DataStore |
| Extensions อื่นๆ | **ทั้งนี้เราต้องตรวจสอบดูให้ดีก่อนลง extensions ว่าสนับสนุน Python version ที่เราลงหรือไม่ |
ศึกษาเกี่ยวกับ Data Catalog และการใช้งาน CKAN เพิ่มเติม
สำหรับผู้ที่สนใจว่า Data Catalog คืออะไร และวิธีการใช้งาน CKAN เบื้องต้น ทาง GBDi ได้ทำคลิปวิดีโออธิบายเรื่องราวดังกล่าว โดยสามารถเข้าไปติดตามชมได้ที่
Data Catalog ตอนที่ 1 – Data Catalog
Data Catalog ตอนที่ 2 – สำรวจโปรแกรม CKAN
Data Catalog ตอนที่ 3 – การใช้งาน CKAN เบื้องต้น